This vignette introduces eplusr class structure, how to read EnergyPlus IDFs and perform modifications on them. Familiarity with data.table is useful, but not essential to follow this vignette.
Class structure
Below shows the class structure in eplusr.
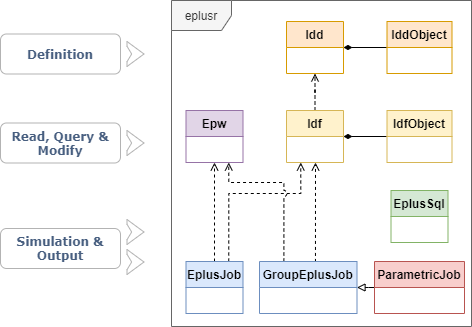
Basically, eplusr uses Idf class to present the whole
IDF file and IdfObject class to present a single object in
an IDF. Both Idf and IdfObject class contain
member functions for helping modify the data in IDF so it complies with
the underlying EnergyPlus IDD (Input Data Dictionary). Similarly, IDD
file is wrapped into two classes, i.e. Idd and
IddObject.
Besides, Epw class is used to present EnergyPlus Weather
files; EplusJob and GroupEplusJob to run
single and multiple EnergyPlus simulations and collect outputs,
ParametricJob to run parametric EnergyPlus simulations and
collect all outputs.
It is highly recommended to read the documentation to get a thorough understanding on each class.
Preparation
Parsing an IDF requires the IDD data of that version, which serves as
the schema. The IDD file will be parsed first and an Idd
object will be created and cached. That Idd object will be
reused whenever parsing IDFs with that version. For more details, please
see ?use_idd() and ?idd.
Locate EnergyPlus
Usually, when you try to edit an IDF, the corresponding EnergyPlus is
likely to be installed already. If EnergyPlus is installed in standard
location (C:\EnergyPlusVX-Y-0 on Windows,
/usr/local/EnergyPlus-X-Y-0 on Linux and
/Applications/EnergyPlus-X-Y-0 on macOS), eplusr is able to
find it and use the Energy+.idd file distributed with that
release to parse the input IDF.
You can get all detected EnergyPlus versions using
avail_eplus() and meta data of EnergyPlus configuration
using eplus_config().
avail_eplus()
#> [1] '9.6.0'  '22.2.0' '26.1.0'

eplus_ver <- max(avail_eplus())
eplus_ver
#> [1] '26.1.0'

eplus_config(eplus_ver)
#> $version
#> [1] '26.1.0'
#>
#> $dir
#> [1] "/home/runner/.local/EnergyPlus-26-1-0"
#>
#> $exe
#> [1] "energyplus"
If your EnergyPlus was not installed in standard location, you can
add that location using use_eplus(). After adding, all
models of that version will use this path to call EnergyPlus.
use_eplus("C:/EnergyPlusV23-1-0")If the needed version of EnergyPlus was not installed, you can use
install_eplus() to install it.
install_eplus(ver = "latest")Download EnergyPlus IDD
Sometimes you may just want to edit the model without installing the
whole EnergyPlus software. You can just download the IDD file of that
version using download_idd() or set download
to TRUE in use_idd(). The code below will
download IDD file for the latest EnergyPlus release, parse it and create
an Idd object that will be used whenever parsing all
EnergyPlus models of that version.
path_idd <- download_idd("latest", dir = tempdir())
use_idd(path_idd)

# OR
use_idd("latest", download = TRUE)
Read and parse IDF
All IDF reading process starts with function read_idf(),
which returns an Idf object. The IDF will be printed in a
similar style you see in IDF Editor, with additional heading lines
showing the Path, Version of the model. The
classes of objects in the model are ordered by groups and the number of
objects in classes are shown in square bracket.
Now let’s read an IDF file distributed with the latest EnergyPlus
release. As we have already got the IDD, we can just ignore the
idd argument.
Note: Once an EnergyPlus version X.Y is
successfully located, all IDFs with versions lower than X.Y
can be parsed. For example, if you have EnergyPlus v9.1 installed, all
IDFs from v7.2 to v9.1 can be parsed using simply
read_idf(path) without specifying idd. This is
because eplusr will use IDD files distributed with EnergyPlus
VersionUpdater program.
path <- path_eplus_example(eplus_ver, "5Zone_Transformer.idf")
model <- read_idf(path)
#> IDD v26.1.0 has not been parsed before. Try to locate 'Energy+.idd' in
#> EnergyPlus v26.1.0 installation folder '/usr/local/EnergyPlus-26-1-0'.
#> IDD file found: '/home/runner/.local/EnergyPlus-26-1-0/Energy+.idd'.
#> Start parsing...
#> Parsing completed.

model
#> ── EnergPlus Input Data File ───────────────────────────────────────────────────
#>  • Path: '/home/runner/.local/EnergyPlus-26-1-0/ExampleFiles/5Zone_Transformer.…
#>  • Version: '26.1.0'
#>
#> Group: <Simulation Parameters>
#> ├─ [01<O>] Class: <Version>
#> │─ [01<O>] Class: <SimulationControl>
#> │─ [01<O>] Class: <Building>
#> │─ [01<O>] Class: <SurfaceConvectionAlgorithm:Inside>
#> │─ [01<O>] Class: <SurfaceConvectionAlgorithm:Outside>
....
Methods in Idf class
Idf class provides lots of methods to programmatically
query and modify EnergyPlus models. See table below. This vignette will
demonstrate some of them.
| Category | Method | Functionality |
|---|---|---|
| Basic Info | $version() |
Get Idf version |
$path() |
Get Idf file path | |
$group_name() |
Get group names | |
$class_name() |
Get class names | |
$is_valid_group() |
Check group existence | |
$is_valid_class() |
Check class existence | |
| Definition | $definition() |
Get corresponding IddObject
|
| Object Info | $object_id() |
Get object unique ID |
$object_name() |
Get object name | |
$object_num() |
Get object number in class | |
$is_valid_id() |
Check object ID existence | |
$is_valid_name() |
Check object name existence | |
| Object Relation | $object_relation() |
Get object relation with others |
| Object Query | $object() |
Get single object |
$objects() |
Get multiple objects | |
$object_unique() |
Get the unique object | |
$objects_in_class() |
Get objects in class | |
$objects_in_group() |
Get objects in group | |
$objects_in_relation() |
Get objects in relation | |
$search_object() |
Get objects using regular expression | |
| Object Modification | $dup() |
Duplicate objects |
$add() |
Add new objects | |
$set() |
Modify existing objects | |
$del() |
Delete existing objects | |
$purge() |
Delete unused resource objects | |
$duplicated() |
Detect duplicated objects | |
$unique() |
Delete duplicated objects | |
$rename() |
Change object names | |
$insert() |
Add new objects from other IdfObjects |
|
$load() |
Add new objects from strings and data.frames | |
$update() |
Update object values from strings and data.frames | |
$paste() |
Add new objects from IDF Editor
Copy obj
|
|
$search_value() |
Get objects whose values match regular expression | |
$replace_value() |
Modify object values using regular expression | |
| Validation | $validate() |
Check any errors in Idf
|
$is_valid() |
Check if no error exists in Idf
|
|
| Data Extraction | $to_table() |
Extract Idf data in data.frames |
$to_string() |
Extract Idf data in strings |
|
| Save | $is_unsaved() |
Check if unsaved changes exist |
$save() |
Save Idf to an .idf file |
|
| Clone | $clone() |
Create an copy |
| Run | $run() |
Run Idf together with an
Epw
|
| Geometry | $geometry() |
Extract Idf geometry and perform
operations on them |
$view() |
Show Idf 3D geometry using the rgl
package |
|
$print() |
Print Idf in different details |
Below will show same example usage of methods listed above.
Basic Info
If you want to see what groups and classes exist in your model, use
$group_name() and $class_name()
respectively.
model$group_name()
#>  [1] "Simulation Parameters"
#>  [2] "Location and Climate"
#>  [3] "Schedules"
#>  [4] "Surface Construction Elements"
#>  [5] "Thermal Zones and Surfaces"
....
model$class_name()
#>  [1] "Version"
#>  [2] "SimulationControl"
#>  [3] "Building"
#>  [4] "SurfaceConvectionAlgorithm:Inside"
#>  [5] "SurfaceConvectionAlgorithm:Outside"
....

# categorize by group names
model$class_name(by_group = TRUE)
#> $`Simulation Parameters`
#> [1] "Version"                            "SimulationControl"
#> [3] "Building"                           "SurfaceConvectionAlgorithm:Inside"
#> [5] "SurfaceConvectionAlgorithm:Outside" "HeatBalanceAlgorithm"
#> [7] "Timestep"
....
You can use $is_valid_group() and
$is_valid_class() to check if curtain groups or names exist
in current model.
model$is_valid_group("Schedules")
#> [1] TRUE
model$is_valid_class("ZoneInfiltration:DesignFlowRate")
#> [1] TRUE
Class definition
You can get class definition using $definition(), which
returns an IddObject. All required fields in each class are
marked with *. For example, you can get the
IddObject of class Material:
def_mat <- model$definition("Material")
def_mat
#> <IddObject: 'Material'>
#> ── MEMO ────────────────────────────────────────────────────────────────────────
#>   "Regular materials described with full set of thermal properties"
#>
#> ── PROPERTIES ──────────────────────────────────────────────────────────────────
#>   * Group: 'Surface Construction Elements'
#>   * Unique: FALSE
#>   * Required: FALSE
#>   * Total fields: 9
#>
#> ── FIELDS ──────────────────────────────────────────────────────────────────────
#>   1*: Name
#>   2*: Roughness
#>   3*: Thickness
#>   4*: Conductivity
#>   5*: Density
#>   6*: Specific Heat
#>   7 : Thermal Absorptance
#>   8 : Solar Absorptance
#>   9 : Visible Absorptance
You can also achieve this using methods in Idd
class.
idd <- use_idd("latest")
idd$Material

# OR
# idd$object("Material")

# OR
# idd_object("latest", "Material")
With the IddObject, you can easily get class and field
properties using methods it has.
For example, you can get all default field values using
$field_default(). As we did not give any field index or
name, a list is returned containing default values of all fields. The
type of each value will be consistent with field definition.
NOTE: For numeric fields with default values being
"autosize"or"autocalculate", the type of returned values will be “character”.
def_val <- def_mat$field_default()
str(def_val)
#> List of 9
#>  $ Name               : chr NA
#>  $ Roughness          : chr NA
#>  $ Thickness          : num NA
#>  $ Conductivity       : num NA
#>  $ Density            : num NA
#>  $ Specific Heat      : num NA
#>  $ Thermal Absorptance: num 0.9
#>  $ Solar Absorptance  : num 0.7
#>  $ Visible Absorptance: num 0.7
Please see ?IddObject for detailed documentation on
IddObject class.
Get object
In an Idf, each object in the model is assigned with an
unique ID according to its appearance sequence in the IDF
file. You can find all valid IDs using
$object_id().
model$object_id(c("Material", "Construction"))
#> $Material
#>  [1] 43 44 45 46 47 48 49 50 51 52
#>
#> $Construction
#> [1] 66 67 68 69 70 71 72
You can get all object names using $object_name(). If
the class does not have name attribute, NA will
returned.
model$object_name(c("Version", "Material", "Construction"))
#> $Version
#> [1] NA
#>
#> $Material
#>  [1] "WD10" "RG01" "BR01" "IN46" "WD01" "PW03" "IN02" "GP01" "GP02" "CC03"
#>
#> $Construction
#> [1] "ROOF-1"               "WALL-1"               "CLNG-1"
#> [4] "FLOOR-SLAB-1"         "INT-WALL-1"           "Dbl Clr 3mm/13mm Air"
#> [7] "Sgl Grey 3mm"
Object number in each class can be retrieved using
$object_num().
model$object_num(c("BuildingSurface:Detailed", "Material", "Output:Variable"))
#> [1] 40 10 13
Having the object ID or name, you can easily get any object using
$object() which returns an IdfObject or using
$objects() which returns a list of
IdfObjects.
NOTE: The matching of object names is case-insensitive. For instance,
model$object("rOoF")is equivalent tomodel$object("roof").
model$objects(c("WD10", "ROOF-1"))
#> $WD10
#> <IdfObject: 'Material'> [ID:43] `WD10`
#> Class: <Material>
#> ├─ 1*: "WD10",         !- Name
#> │─ 2*: "MediumSmooth", !- Roughness
#> │─ 3*: 0.667,          !- Thickness {m}
#> │─ 4*: 0.115,          !- Conductivity {W/m-K}
#> │─ 5*: 513,            !- Density {kg/m3}
#> │─ 6*: 1381,           !- Specific Heat {J/kg-K}
#> │─ 7 : 0.9,            !- Thermal Absorptance
#> │─ 8 : 0.78,           !- Solar Absorptance
#> └─ 9 : 0.78;           !- Visible Absorptance
#>
#> $`ROOF-1`
#> <IdfObject: 'Construction'> [ID:66] `ROOF-1`
#> Class: <Construction>
#> ├─ 1*: "ROOF-1",   !- Name
#> │─ 2*: "RG01",     !- Outside Layer
#> │─ 3 : "BR01",     !- Layer 2
#> │─ 4 : "IN46",     !- Layer 3
#> └─ 5 : "WD01";     !- Layer 4
If you want to get all objects in a single class, use
$objects_in_class().
model$objects_in_class("Material")
#> $WD10
#> <IdfObject: 'Material'> [ID:43] `WD10`
#> Class: <Material>
#> ├─ 1*: "WD10",         !- Name
#> │─ 2*: "MediumSmooth", !- Roughness
#> │─ 3*: 0.667,          !- Thickness {m}
#> │─ 4*: 0.115,          !- Conductivity {W/m-K}
#> │─ 5*: 513,            !- Density {kg/m3}
#> │─ 6*: 1381,           !- Specific Heat {J/kg-K}
#> │─ 7 : 0.9,            !- Thermal Absorptance
#> │─ 8 : 0.78,           !- Solar Absorptance
#> └─ 9 : 0.78;           !- Visible Absorptance
#>
#> $RG01
#> <IdfObject: 'Material'> [ID:44] `RG01`
#> Class: <Material>
#> ├─ 1*: "RG01",     !- Name
#> │─ 2*: "Rough",    !- Roughness
#> │─ 3*: 0.0127,     !- Thickness {m}
#> │─ 4*: 1.442,      !- Conductivity {W/m-K}
#> │─ 5*: 881,        !- Density {kg/m3}
#> │─ 6*: 1674,       !- Specific Heat {J/kg-K}
#> │─ 7 : 0.9,        !- Thermal Absorptance
#> │─ 8 : 0.65,       !- Solar Absorptance
#> └─ 9 : 0.65;       !- Visible Absorptance
#>
#> $BR01
#> <IdfObject: 'Material'> [ID:45] `BR01`
#> Class: <Material>
#> ├─ 1*: "BR01",         !- Name
....
Also, you can get all objects in a single class using
"$" or "[[". Class names can be given in
underscore-style. For example, you can just use
model$Material_NoMass instead of
model$`Material:Nomass` to save some typing.
model$Material_NoMass
#> $CP01
#> <IdfObject: 'Material:NoMass'> [ID:53] `CP01`
#> Class: <Material:NoMass>
#> ├─ 1*: "CP01",     !- Name
#> │─ 2*: "Rough",    !- Roughness
#> │─ 3*: 0.367,      !- Thermal Resistance {m2-K/W}
#> │─ 4 : 0.9,        !- Thermal Absorptance
#> │─ 5 : 0.75,       !- Solar Absorptance
#> └─ 6 : 0.75;       !- Visible Absorptance
#>
#> $`MAT-SB-U`
#> <IdfObject: 'Material:NoMass'> [ID:54] `MAT-SB-U`
#> Class: <Material:NoMass>
#> ├─ 1*: "MAT-SB-U",    !- Name
#> │─ 2*: "Rough",       !- Roughness
#> │─ 3*: 0.117406666,   !- Thermal Resistance {m2-K/W}
#> │─ 4 : 0.65,          !- Thermal Absorptance
#> │─ 5 : 0.65,          !- Solar Absorptance
#> └─ 6 : 0.65;          !- Visible Absorptance
#>
#> $`MAT-CLNG-1`
#> <IdfObject: 'Material:NoMass'> [ID:55] `MAT-CLNG-1`
#> Class: <Material:NoMass>
#> ├─ 1*: "MAT-CLNG-1", !- Name
#> │─ 2*: "Rough",      !- Roughness
#> │─ 3*: 0.65225929,   !- Thermal Resistance {m2-K/W}
#> │─ 4 : 0.65,         !- Thermal Absorptance
#> │─ 5 : 0.65,         !- Solar Absorptance
#> └─ 6 : 0.65;         !- Visible Absorptance
#>
....
# OR
# model[["Material_NoMass"]]
Based on the above, if you want to get the first object in class
RunPeriod, you can simply run:
rp <- model$RunPeriod[[1]]For unique object, such like SimulationControl and
Building, you can use $object_unique() which
returns a single IdfObject object.
model$object_unique("Building")
#> <IdfObject: 'Building'> [ID:3] `Building`
#> Class: <Building>
#> ├─ 1: "Building",     !- Name
#> │─ 2: 30,             !- North Axis {deg}
#> │─ 3: "City",         !- Terrain
#> │─ 4: 0.04,           !- Loads Convergence Tolerance Value {W}
#> │─ 5: 0.4,            !- Temperature Convergence Tolerance Value {deltaC}
#> │─ 6: "FullExterior", !- Solar Distribution
#> │─ 7: 25,             !- Maximum Number of Warmup Days
#> └─ 8: 6;              !- Minimum Number of Warmup Days

# OR just
# model$Building
Many fields in a model can be referred by others. For example, the
Outside Layer and other fields in Construction
class refer to the Name field in Material
class and other material related classes. Here it means that the
Outside Layer field refers to the
Name field and the Name field is
referred by the Outside Layer.
$object_relation() provides a simple interface to get this
kind of relation. It takes a single object ID or name and also a
relation direction, and returns an IdfRelation object which
contains data presenting such relation above.
model$object_name("Material:NoMass")
#> $`Material:NoMass`
#> [1] "CP01"        "MAT-SB-U"    "MAT-CLNG-1"  "MAT-FLOOR-1"
model$object_relation("mat-clng-1")
#> $ref_to
#> Empty data.table (0 rows and 24 cols): class_id,class_name,object_id,object_name,field_id,field_index...
#>
#> $ref_by
#>    class_id   class_name object_id object_name field_id field_index
#>       <int>       <char>     <int>      <char>    <int>       <int>
#> 1:       92 Construction        68      CLNG-1    16878           2
#>       field_name value_id  value_chr value_num type_enum src_class_id
#>           <char>    <int>     <char>     <num>     <int>        <int>
#> 1: Outside Layer      634 MAT-CLNG-1        NA         5           57
#>     src_class_name src_object_id src_object_name src_field_id src_field_index
#>             <char>         <int>          <char>        <int>           <int>
#> 1: Material:NoMass            55      MAT-CLNG-1        12603               1
#>    src_field_name src_value_id src_value_chr src_value_num src_type_enum
#>            <char>        <int>        <char>         <num>         <int>
#> 1:           Name          542    MAT-CLNG-1            NA             4
#>    src_enum   dep
#>       <int> <int>
#> 1:        2     0
#>
#> $node
#> Empty data.table (0 rows and 24 cols): class_id,class_name,object_id,object_name,field_id,field_index...
#>
#> attr(,"class")
#> [1] "IdfRelation" "list"
Above shows that no-mass material MAT-CLNG-1 is used at
the outside layer of a construction named CLNG-1. You can
extract both of them using $objects_in_relation().
mat_const <- model$objects_in_relation("mat-clng-1", "ref_by")
mat_const
#> $`MAT-CLNG-1`
#> <IdfObject: 'Material:NoMass'> [ID:55] `MAT-CLNG-1`
#> Class: <Material:NoMass>
#> ├─ 1*: "MAT-CLNG-1", !- Name
#> │─ 2*: "Rough",      !- Roughness
#> │─ 3*: 0.65225929,   !- Thermal Resistance {m2-K/W}
#> │─ 4 : 0.65,         !- Thermal Absorptance
#> │─ 5 : 0.65,         !- Solar Absorptance
#> └─ 6 : 0.65;         !- Visible Absorptance
#>
#> $`CLNG-1`
#> <IdfObject: 'Construction'> [ID:68] `CLNG-1`
#> Class: <Construction>
#> ├─ 1*: "CLNG-1",     !- Name
#> └─ 2*: "MAT-CLNG-1"; !- Outside Layer
After you get the objects, you can perform detailed modifications on
them using methods $set() in both Idf and
IdfObject class.
Similarly, you can use "$" and "[[" to get
a single value in an IdfObject class or "[" to
get multiple values just like normal lists in R.
rp$Begin_Day_of_Month
#> [1] 14

# OR
# rp[["Begin Day of Month"]]
# rp[[3]]
You can also make a chain.
model$RunPeriod$WinterDay$Begin_Day_of_Month
#> [1] 14
Modify object
There are two ways to modify objects in eplusr. One is using methods
in Idf which works on multiple objects, and the other way
is using methods in IdfObject which only works for a single
object.
NOTE: Validations are performed during object modifications under different strictness level (
none,draft,finalor custom yours usingcustom_validate()). For detailed explanations, please see?level_checks.
Object IDs will be appended after new objects are added, and the most-newly added object will always have the max ID. Object IDs will never be reused, even when their bound objects have been deleted.
Duplicate existing objects (Idf$dup())
$dup() duplicates objects specified by object IDs or
names. If the target classes have a name attribute, you can assign new
names to the duplicated objects in form
new_name = "old_name". If new name is not given, the newly
added object will have the same name as the original object except a
appended suffix of “1”, “2” and etc.
model$dup(c(my_roof = "ROOF-1", "ROOF-1", "WALL-1"))
#> New names of duplicated objects not given are automatically generated: #2|
#> Object ID [324] in class 'Construction' --> New object name 'ROOF-1 1' #3|
#> Object ID [325] in class 'Construction' --> New object name 'WALL-1 1'
#> $my_roof
#> <IdfObject: 'Construction'> [ID:323] `my_roof`
#> Class: <Construction>
#> ├─ 1*: "my_roof",  !- Name
#> │─ 2*: "RG01",     !- Outside Layer
#> │─ 3 : "BR01",     !- Layer 2
#> │─ 4 : "IN46",     !- Layer 3
#> └─ 5 : "WD01";     !- Layer 4
#>
#> $`ROOF-1 1`
#> <IdfObject: 'Construction'> [ID:324] `ROOF-1 1`
#> Class: <Construction>
#> ├─ 1*: "ROOF-1 1", !- Name
#> │─ 2*: "RG01",     !- Outside Layer
#> │─ 3 : "BR01",     !- Layer 2
#> │─ 4 : "IN46",     !- Layer 3
#> └─ 5 : "WD01";     !- Layer 4
#>
#> $`WALL-1 1`
#> <IdfObject: 'Construction'> [ID:325] `WALL-1 1`
#> Class: <Construction>
#> ├─ 1*: "WALL-1 1", !- Name
#> │─ 2*: "WD01",     !- Outside Layer
#> │─ 3 : "PW03",     !- Layer 2
#> │─ 4 : "IN02",     !- Layer 3
#> └─ 5 : "GP01";     !- Layer 4
Add new objects using lists (Idf$add())
You can add new objects using $add(). With
.default being TRUE, the default behavior, all
empty fields are filled with default values, if possible. Only minimum
fields will be added by default. But you can change it by setting
.all to TRUE.
Fields can be given using either indices or names. Field index
X is specified in format ..X. Field name can
be given in underscore-style, e.g. all Begin Month,
begin month and begin_month refer to the same
field.
You can also add new comments alongside with new values using the
special element .comment.
For example, here we add two new objects with comments in
RunPeriod class:
rp1 <- list(RunPeriod = list("rp_test_1", 1, 1, NULL, 2, 1, .comment = c("Comment for new object 1", "Another comment")))

model$add(rp1,
  RunPeriod = .(name = "rp_test_2", begin_month = 3, begin_day_of_month = 1,
    ..5 = 4, ..6 = 1, .comment = "Comment for new object 2"
  )
)
#> $rp_test_1
#> <IdfObject: 'RunPeriod'> [ID:326] `rp_test_1`
#> ── COMMENTS ────────────────────────────────────────────────────────────────────
#> !Comment for new object 1
#> !Another comment
#> ── VALUES ──────────────────────────────────────────────────────────────────────
#> Class: <RunPeriod>
#> ├─ 1*: "rp_test_1", !- Name
#> │─ 2*: 1,           !- Begin Month
#> │─ 3*: 1,           !- Begin Day of Month
#> │─ 4 : <Blank>,     !- Begin Year
#> │─ 5*: 2,           !- End Month
#> │─ 6*: 1,           !- End Day of Month
#> └─ 7 : <Blank>;     !- End Year
#>
#> $rp_test_2
#> <IdfObject: 'RunPeriod'> [ID:327] `rp_test_2`
#> ── COMMENTS ────────────────────────────────────────────────────────────────────
#> !Comment for new object 2
#> ── VALUES ──────────────────────────────────────────────────────────────────────
#> Class: <RunPeriod>
#> ├─ 1*: "rp_test_2", !- Name
#> │─ 2*: 3,           !- Begin Month
#> │─ 3*: 1,           !- Begin Day of Month
#> │─ 4 : <Blank>,     !- Begin Year
#> │─ 5*: 4,           !- End Month
#> │─ 6*: 1,           !- End Day of Month
#> └─ 7 : <Blank>;     !- End Year
Note that the use .() inside $add(). It is
just an alias of list().
If you want to create multiple objects in one go, you can use
:=, instead of =. For instance, below we
create 3 materials. Note that field values with shorter length are
automatically recycled.
model$add(Material := .(
  sprintf("mat%i", 1:3),
  c("Rough", "MediumSmooth", "Smooth"),
  c(0.05, 0.1, 0.2),
  0.72,
  c(1800, 1850, 1800),
  840
))
#> $mat1
#> <IdfObject: 'Material'> [ID:328] `mat1`
#> Class: <Material>
#> ├─ 1*: "mat1",     !- Name
#> │─ 2*: "Rough",    !- Roughness
#> │─ 3*: 0.05,       !- Thickness {m}
#> │─ 4*: 0.72,       !- Conductivity {W/m-K}
#> │─ 5*: 1800,       !- Density {kg/m3}
#> └─ 6*: 840;        !- Specific Heat {J/kg-K}
#>
#> $mat2
#> <IdfObject: 'Material'> [ID:329] `mat2`
#> Class: <Material>
#> ├─ 1*: "mat2",         !- Name
#> │─ 2*: "MediumSmooth", !- Roughness
#> │─ 3*: 0.1,            !- Thickness {m}
#> │─ 4*: 0.72,           !- Conductivity {W/m-K}
#> │─ 5*: 1850,           !- Density {kg/m3}
#> └─ 6*: 840;            !- Specific Heat {J/kg-K}
#>
#> $mat3
#> <IdfObject: 'Material'> [ID:330] `mat3`
#> Class: <Material>
#> ├─ 1*: "mat3",     !- Name
#> │─ 2*: "Smooth",   !- Roughness
#> │─ 3*: 0.2,        !- Thickness {m}
#> │─ 4*: 0.72,       !- Conductivity {W/m-K}
#> │─ 5*: 1800,       !- Density {kg/m3}
#> └─ 6*: 840;        !- Specific Heat {J/kg-K}
Set new values and comments using lists
(Idf$set())
Changing values of existing objects can be conducted using
$set() in Idf and IdfObject:
Note that you can also use .() here as an alias of
list().
model$set(
  rp_test_1 = .(name = "rp_test_3", begin_day_of_month = 2,
    .comment = c(format(Sys.Date()), "begin day has been changed.")
  )
)
#> $rp_test_3
#> <IdfObject: 'RunPeriod'> [ID:326] `rp_test_3`
#> ── COMMENTS ────────────────────────────────────────────────────────────────────
#> !2026-07-12
#> !begin day has been changed.
#> ── VALUES ──────────────────────────────────────────────────────────────────────
#> Class: <RunPeriod>
#> ├─ 1*: "rp_test_3", !- Name
#> │─ 2*: 1,           !- Begin Month
#> │─ 3*: 2,           !- Begin Day of Month
#> │─ 4 : <Blank>,     !- Begin Year
#> │─ 5*: 2,           !- End Month
#> │─ 6*: 1,           !- End Day of Month
#> └─ 7 : <Blank>;     !- End Year
You can modify all objects in a class using
class := list(...):
model$set(RunPeriod := .(
  ..8 = c("Monday", "Tuesday", "Wednesday", "Thursday"),
  ..10 = "No"
))
#> $WinterDay
#> <IdfObject: 'RunPeriod'> [ID:8] `WinterDay`
#> Class: <RunPeriod>
#> ├─ 01*: "WinterDay", !- Name
#> │─ 02*: 1,           !- Begin Month
#> │─ 03*: 14,          !- Begin Day of Month
#> │─ 04 : <Blank>,     !- Begin Year
#> │─ 05*: 1,           !- End Month
#> │─ 06*: 14,          !- End Day of Month
#> │─ 07 : <Blank>,     !- End Year
#> │─ 08 : "Monday",    !- Day of Week for Start Day
#> │─ 09 : "Yes",       !- Use Weather File Holidays and Special Days
#> │─ 10 : "No",        !- Use Weather File Daylight Saving Period
#> │─ 11 : "No",        !- Apply Weekend Holiday Rule
#> │─ 12 : "Yes",       !- Use Weather File Rain Indicators
#> └─ 13 : "Yes";       !- Use Weather File Snow Indicators
#>
#> $SummerDay
#> <IdfObject: 'RunPeriod'> [ID:9] `SummerDay`
#> Class: <RunPeriod>
#> ├─ 01*: "SummerDay", !- Name
#> │─ 02*: 7,           !- Begin Month
#> │─ 03*: 7,           !- Begin Day of Month
#> │─ 04 : <Blank>,     !- Begin Year
#> │─ 05*: 7,           !- End Month
#> │─ 06*: 7,           !- End Day of Month
#> │─ 07 : <Blank>,     !- End Year
#> │─ 08 : "Tuesday",   !- Day of Week for Start Day
#> │─ 09 : "Yes",       !- Use Weather File Holidays and Special Days
#> │─ 10 : "No",        !- Use Weather File Daylight Saving Period
#> │─ 11 : "No",        !- Apply Weekend Holiday Rule
#> │─ 12 : "Yes",       !- Use Weather File Rain Indicators
#> └─ 13 : "Yes";       !- Use Weather File Snow Indicators
#>
#> $rp_test_3
#> <IdfObject: 'RunPeriod'> [ID:326] `rp_test_3`
#> ── COMMENTS ────────────────────────────────────────────────────────────────────
#> !2026-07-12
#> !begin day has been changed.
#> ── VALUES ──────────────────────────────────────────────────────────────────────
#> Class: <RunPeriod>
#> ├─ 01*: "rp_test_3", !- Name
#> │─ 02*: 1,           !- Begin Month
#> │─ 03*: 2,           !- Begin Day of Month
#> │─ 04 : <Blank>,     !- Begin Year
#> │─ 05*: 2,           !- End Month
#> │─ 06*: 1,           !- End Day of Month
#> │─ 07 : <Blank>,     !- End Year
#> │─ 08 : "Wednesday", !- Day of Week for Start Day
#> │─ 09 : <"Blank">,   !- Use Weather File Holidays and Special Days
#> └─ 10 : "No";        !- Use Weather File Daylight Saving Period
#>
#> $rp_test_2
#> <IdfObject: 'RunPeriod'> [ID:327] `rp_test_2`
#> ── COMMENTS ────────────────────────────────────────────────────────────────────
#> !Comment for new object 2
#> ── VALUES ──────────────────────────────────────────────────────────────────────
#> Class: <RunPeriod>
#> ├─ 01*: "rp_test_2", !- Name
#> │─ 02*: 3,           !- Begin Month
#> │─ 03*: 1,           !- Begin Day of Month
#> │─ 04 : <Blank>,     !- Begin Year
#> │─ 05*: 4,           !- End Month
#> │─ 06*: 1,           !- End Day of Month
#> │─ 07 : <Blank>,     !- End Year
#> │─ 08 : "Thursday",  !- Day of Week for Start Day
#> │─ 09 : <"Blank">,   !- Use Weather File Holidays and Special Days
#> └─ 10 : "No";        !- Use Weather File Daylight Saving Period
If the target class is store as a variable, e.g.
cls <- "RunPeriod", you can input it inside..(), i.e.model$set(..(cls) := list(...))
Multiple objects can be grouped inside .() or
c():
model$set(.("WinterDay", "SummerDay") := .(..10 = "Yes"))
#> $WinterDay
#> <IdfObject: 'RunPeriod'> [ID:8] `WinterDay`
#> Class: <RunPeriod>
#> ├─ 01*: "WinterDay", !- Name
#> │─ 02*: 1,           !- Begin Month
#> │─ 03*: 14,          !- Begin Day of Month
#> │─ 04 : <Blank>,     !- Begin Year
#> │─ 05*: 1,           !- End Month
#> │─ 06*: 14,          !- End Day of Month
#> │─ 07 : <Blank>,     !- End Year
#> │─ 08 : "Monday",    !- Day of Week for Start Day
#> │─ 09 : "Yes",       !- Use Weather File Holidays and Special Days
#> │─ 10 : "Yes",       !- Use Weather File Daylight Saving Period
#> │─ 11 : "No",        !- Apply Weekend Holiday Rule
#> │─ 12 : "Yes",       !- Use Weather File Rain Indicators
#> └─ 13 : "Yes";       !- Use Weather File Snow Indicators
#>
#> $SummerDay
#> <IdfObject: 'RunPeriod'> [ID:9] `SummerDay`
#> Class: <RunPeriod>
#> ├─ 01*: "SummerDay", !- Name
#> │─ 02*: 7,           !- Begin Month
#> │─ 03*: 7,           !- Begin Day of Month
#> │─ 04 : <Blank>,     !- Begin Year
#> │─ 05*: 7,           !- End Month
#> │─ 06*: 7,           !- End Day of Month
#> │─ 07 : <Blank>,     !- End Year
#> │─ 08 : "Tuesday",   !- Day of Week for Start Day
#> │─ 09 : "Yes",       !- Use Weather File Holidays and Special Days
#> │─ 10 : "Yes",       !- Use Weather File Daylight Saving Period
#> │─ 11 : "No",        !- Apply Weekend Holiday Rule
#> │─ 12 : "Yes",       !- Use Weather File Rain Indicators
#> └─ 13 : "Yes";       !- Use Weather File Snow Indicators
For setting a single value on one object, you can write it in a chain:
(model$RunPeriod$rp_test_2$End_Day_of_Month <- 2)
#> [1] 2
Also, if the modified fields are referenced by fields in other objects, the corresponding fields will also be updated.
mat <- model$Material$CC03

mat$value_relation("Name")
#> $ref_to
#> Empty data.table (0 rows and 24 cols): class_id,class_name,object_id,object_name,field_id,field_index...
#>
#> $ref_by
#>    class_id   class_name object_id  object_name field_id field_index
#>       <int>       <char>     <int>       <char>    <int>       <int>
#> 1:       92 Construction        69 FLOOR-SLAB-1    16878           2
#>       field_name value_id value_chr value_num type_enum src_class_id
#>           <char>    <int>    <char>     <num>     <int>        <int>
#> 1: Outside Layer      636      CC03        NA         5           56
#>    src_class_name src_object_id src_object_name src_field_id src_field_index
#>            <char>         <int>          <char>        <int>           <int>
#> 1:       Material            52            CC03        12594               1
#>    src_field_name src_value_id src_value_chr src_value_num src_type_enum
#>            <char>        <int>        <char>         <num>         <int>
#> 1:           Name          521          CC03            NA             4
#>    src_enum   dep
#>       <int> <int>
#> 1:        2     0
#>
#> $node
#> Empty data.table (0 rows and 24 cols): class_id,class_name,object_id,object_name,field_id,field_index...
#>
#> attr(,"class")
#> [1] "IdfRelation" "list"

mat$set(name = "CC03_renamed")
#> <IdfObject: 'Material'> [ID:52] `CC03_renamed`
#> Class: <Material>
#> ├─ 1*: "CC03_renamed", !- Name
#> │─ 2*: "MediumRough",  !- Roughness
#> │─ 3*: 0.1016,         !- Thickness {m}
#> │─ 4*: 1.31,           !- Conductivity {W/m-K}
#> │─ 5*: 2243,           !- Density {kg/m3}
#> │─ 6*: 837,            !- Specific Heat {J/kg-K}
#> │─ 7 : 0.9,            !- Thermal Absorptance
#> │─ 8 : 0.65,           !- Solar Absorptance
#> └─ 9 : 0.65;           !- Visible Absorptance

mat$value_relation("Name")
#> $ref_to
#> Empty data.table (0 rows and 24 cols): class_id,class_name,object_id,object_name,field_id,field_index...
#>
#> $ref_by
#>    class_id   class_name object_id  object_name field_id field_index
#>       <int>       <char>     <int>       <char>    <int>       <int>
#> 1:       92 Construction        69 FLOOR-SLAB-1    16878           2
#>       field_name value_id    value_chr value_num type_enum src_class_id
#>           <char>    <int>       <char>     <num>     <int>        <int>
#> 1: Outside Layer      636 CC03_renamed        NA         5           56
#>    src_class_name src_object_id src_object_name src_field_id src_field_index
#>            <char>         <int>          <char>        <int>           <int>
#> 1:       Material            52    CC03_renamed        12594               1
#>    src_field_name src_value_id src_value_chr src_value_num src_type_enum
#>            <char>        <int>        <char>         <num>         <int>
#> 1:           Name          521  CC03_renamed            NA             4
#>    src_enum   dep
#>       <int> <int>
#> 1:        2     0
#>
#> $node
#> Empty data.table (0 rows and 24 cols): class_id,class_name,object_id,object_name,field_id,field_index...
#>
#> attr(,"class")
#> [1] "IdfRelation" "list"
Sometimes, you may want to get all possible values of fields before
you change them. You can achieve that by using
$value_possible() method in IdfObject
class.
mat$value_possible(c(2, 7))
#>    class_id class_name object_id  object_name field_id field_index
#>       <int>     <char>     <int>       <char>    <int>       <int>
#> 1:       56   Material        52 CC03_renamed    12595           2
#> 2:       56   Material        52 CC03_renamed    12600           7
#>             field_name value_id   value_chr value_num   auto default
#>                 <char>    <int>      <char>     <num> <char>  <list>
#> 1:           Roughness      522 MediumRough        NA   <NA>      NA
#> 2: Thermal Absorptance      527         0.9       0.9   <NA>     0.9
#>                                                        choice            range
#>                                                        <list>           <list>
#> 1: VeryRough,Rough,MediumRough,MediumSmooth,Smooth,VerySmooth <Not Applicable>
#> 2:                                                     [NULL]     (0, 0.99999]
#>    source
#>    <list>
#> 1: [NULL]
#> 2: [NULL]
Insert objects from another IDF (Idf$insert())
Sometimes it may be useful to insert objects from other IDFs. For
example, you may want to import some design days and update location
data from a “.ddy” file. You can achieve that using
$insert().
# read ddy file as normal IDF
path_ddy <- path_eplus_weather(eplus_ver, "USA_CA_San.Francisco.Intl.AP.724940_TMY3.ddy")
ddy <- read_idf(path_ddy, idd = model$version(), encoding = "Latin-1")

model$insert(ddy$SizingPeriod_DesignDay)
#> $`San Francisco Intl Ap Ann Htg 99.6% Condns DB`
#> <IdfObject: 'SizingPeriod:DesignDay'> [ID:331] `San Francisco Intl Ap Ann Htg 99.6% Condns DB`
#> ── COMMENTS ────────────────────────────────────────────────────────────────────
#> ! Using Design Conditions from "Climate Design Data 2009 ASHRAE Handbook"
#> ! San Francisco Intl Ap_CA_USA Extreme Annual Wind Speeds, 1%=12.8m/s, 2.5%=11.…
#> ! San Francisco Intl Ap_CA_USA Extreme Annual Temperatures, Max Drybulb=1.8°C M…
#> ! San Francisco Intl Ap_CA_USA Annual Heating Design Conditions Wind Speed=2.2m…
#> ! Coldest Month=JAN
#> ! San Francisco Intl Ap_CA_USA Annual Heating 99.6%, MaxDB=3.8°C
#> ── VALUES ──────────────────────────────────────────────────────────────────────
#> Class: <SizingPeriod:DesignDay>
#> ├─ 01*: "San Francisco Intl Ap Ann Htg 99.6% Condns DB",  !- Name
#> │─ 02*: 1,                  !- Month
#> │─ 03*: 21,                 !- Day of Month
#> │─ 04*: "WinterDesignDay",  !- Day Type
#> │─ 05 : 3.8,                !- Maximum Dry-Bulb Temperature {C}
#> │─ 06 : 0,                  !- Daily Dry-Bulb Temperature Range {deltaC}
#> │─ 07 : "DefaultMultipliers",  !- Dry-Bulb Temperature Range Modifier Type
#> │─ 08 : <"Blank">,          !- Dry-Bulb Temperature Range Modifier Day Schedule…
#> │─ 09 : "Wetbulb",          !- Humidity Condition Type
....

# get location data
loc <- ddy$Site_Location$value()

model$Site_Location$set(loc)
#> <IdfObject: 'Site:Location'> [ID:10] `San Francisco Intl Ap_CA_USA Design_Conditions`
#> Class: <Site:Location>
#> ├─ 1*: "San Francisco Intl Ap_CA_USA Design_Conditions",  !- Name
#> │─ 2 : 37.62,              !- Latitude {deg}
#> │─ 3 : -122.4,             !- Longitude {deg}
#> │─ 4 : -8,                 !- Time Zone {hr}
#> └─ 5 : 2;                  !- Elevation {m}
Load objects using characters or data.frames
(Idf$load())
Here load means insert. You can use
character vectors or data.frames to load new objects.
mat_chr <- c("Construction,", "new_const1,", paste0(model$Material[[1]]$name(), ";"))
model$load(mat_chr)
#> $new_const1
#> <IdfObject: 'Construction'> [ID:349] `new_const1`
#> Class: <Construction>
#> ├─ 1*: "new_const1", !- Name
#> └─ 2*: "WD10";       !- Outside Layer

# extract first construction data in a data.table
dt <- model$Construction[[1L]]$to_table()
# modify value
dt[1, value := "new_const2"]
model$load(dt)
#> $new_const2
#> <IdfObject: 'Construction'> [ID:350] `new_const2`
#> Class: <Construction>
#> ├─ 1*: "new_const2", !- Name
#> │─ 2*: "RG01",       !- Outside Layer
#> │─ 3 : "BR01",       !- Layer 2
#> │─ 4 : "IN46",       !- Layer 3
#> └─ 5 : "WD01";       !- Layer 4
The relation is automatically generated whenever new fields are added or modified.
model$object_relation("new_const1")
#> $ref_to
#>    class_id   class_name object_id object_name field_id field_index
#>       <int>       <char>     <int>      <char>    <int>       <int>
#> 1:       92 Construction       349  new_const1    16878           2
#>       field_name value_id value_chr value_num type_enum src_class_id
#>           <char>    <int>    <char>     <num>     <int>        <int>
#> 1: Outside Layer     3808      WD10        NA         5           56
#>    src_class_name src_object_id src_object_name src_field_id src_field_index
#>            <char>         <int>          <char>        <int>           <int>
#> 1:       Material            43            WD10        12594               1
#>    src_field_name src_value_id src_value_chr src_value_num src_type_enum
#>            <char>        <int>        <char>         <num>         <int>
#> 1:           Name          440          WD10            NA             4
#>    src_enum   dep
#>       <int> <int>
#> 1:        2     0
#>
#> $ref_by
#> Empty data.table (0 rows and 24 cols): class_id,class_name,object_id,object_name,field_id,field_index...
#>
#> $node
#> Empty data.table (0 rows and 24 cols): class_id,class_name,object_id,object_name,field_id,field_index...
#>
#> attr(,"class")
#> [1] "IdfRelation" "list"
model$object_relation("new_const2")
#> $ref_to
#>    class_id   class_name object_id object_name field_id field_index
#>       <int>       <char>     <int>      <char>    <int>       <int>
#> 1:       92 Construction       350  new_const2    16878           2
#> 2:       92 Construction       350  new_const2    16879           3
#> 3:       92 Construction       350  new_const2    16880           4
#> 4:       92 Construction       350  new_const2    16881           5
#>       field_name value_id value_chr value_num type_enum src_class_id
#>           <char>    <int>    <char>     <num>     <int>        <int>
#> 1: Outside Layer     3810      RG01        NA         5           56
#> 2:       Layer 2     3811      BR01        NA         5           56
#> 3:       Layer 3     3812      IN46        NA         5           56
#> 4:       Layer 4     3813      WD01        NA         5           56
#>    src_class_name src_object_id src_object_name src_field_id src_field_index
#>            <char>         <int>          <char>        <int>           <int>
#> 1:       Material            44            RG01        12594               1
#> 2:       Material            45            BR01        12594               1
#> 3:       Material            46            IN46        12594               1
#> 4:       Material            47            WD01        12594               1
#>    src_field_name src_value_id src_value_chr src_value_num src_type_enum
#>            <char>        <int>        <char>         <num>         <int>
#> 1:           Name          449          RG01            NA             4
#> 2:           Name          458          BR01            NA             4
#> 3:           Name          467          IN46            NA             4
#> 4:           Name          476          WD01            NA             4
#>    src_enum   dep
#>       <int> <int>
#> 1:        2     0
#> 2:        2     0
#> 3:        2     0
#> 4:        2     0
#>
#> $ref_by
#> Empty data.table (0 rows and 24 cols): class_id,class_name,object_id,object_name,field_id,field_index...
#>
#> $node
#> Empty data.table (0 rows and 24 cols): class_id,class_name,object_id,object_name,field_id,field_index...
#>
#> attr(,"class")
#> [1] "IdfRelation" "list"
Update objects using characters or data.frames
(Idf$update())
Here update means set. You can use
character vectors or data.frames to update existing objects.
mat_chr <- model$Material$WD10$to_string()
# change material density
mat_chr[6] <- "600,"
model$update(mat_chr)
#> $WD10
#> <IdfObject: 'Material'> [ID:43] `WD10`
#> Class: <Material>
#> ├─ 1*: "WD10",         !- Name
#> │─ 2*: "MediumSmooth", !- Roughness
#> │─ 3*: 0.667,          !- Thickness {m}
#> │─ 4*: 0.115,          !- Conductivity {W/m-K}
#> │─ 5*: 600,            !- Density {kg/m3}
#> │─ 6*: 1381,           !- Specific Heat {J/kg-K}
#> │─ 7 : 0.9,            !- Thermal Absorptance
#> │─ 8 : 0.78,           !- Solar Absorptance
#> └─ 9 : 0.78;           !- Visible Absorptance

# extract roof construction data in a data.table
dt <- model$Construction$`ROOF-1`$to_table()
# modify value
dt[1, value := "ROOF"]
model$update(dt)
#> $ROOF
#> <IdfObject: 'Construction'> [ID:66] `ROOF`
#> Class: <Construction>
#> ├─ 1*: "ROOF",     !- Name
#> │─ 2*: "RG01",     !- Outside Layer
#> │─ 3 : "BR01",     !- Layer 2
#> │─ 4 : "IN46",     !- Layer 3
#> └─ 5 : "WD01";     !- Layer 4
Delete existing objects (Idf$del())
$del() will delete objects specified by object IDs or
names. For example, in current model, there is a material named
"MAT-CLNG-1" in class Material:NoMass. Let’s
see if it has been referred by other objects.
model$Material_NoMass$`MAT-CLNG-1`$value_relation()
#> $ref_to
#> Empty data.table (0 rows and 24 cols): class_id,class_name,object_id,object_name,field_id,field_index...
#>
#> $ref_by
#>    class_id   class_name object_id object_name field_id field_index
#>       <int>       <char>     <int>      <char>    <int>       <int>
#> 1:       92 Construction        68      CLNG-1    16878           2
#>       field_name value_id  value_chr value_num type_enum src_class_id
#>           <char>    <int>     <char>     <num>     <int>        <int>
#> 1: Outside Layer      634 MAT-CLNG-1        NA         5           57
#>     src_class_name src_object_id src_object_name src_field_id src_field_index
#>             <char>         <int>          <char>        <int>           <int>
#> 1: Material:NoMass            55      MAT-CLNG-1        12603               1
#>    src_field_name src_value_id src_value_chr src_value_num src_type_enum
#>            <char>        <int>        <char>         <num>         <int>
#> 1:           Name          542    MAT-CLNG-1            NA             4
#>    src_enum   dep
#>       <int> <int>
#> 1:        2     0
#>
#> $node
#> Empty data.table (0 rows and 24 cols): class_id,class_name,object_id,object_name,field_id,field_index...
#>
#> attr(,"class")
#> [1] "IdfRelation" "list"
As we can see, MAT-CLNG-1 has been referred by a
construction named "CLNG-1".
First, let’s try to direct delete Material
MAT-CLNG-1.
model$del("mat-clng-1")
#> Error:
#> ! Cannot delete object(s) that are referred by others: Class:
#>   <Material:NoMass> └─ Object [ID:55] <MAT-CLNG-1> └─ 1: "MAT-CLNG-1"; !- Name
#>   ^~~~~~~~~~~~~~~~~~~~~~~~~ └─ Class: <Construction> └─ Object [ID:68] <CLNG-1>
#>   └─ 2: "MAT-CLNG-1"; !- Outside Layer
We got an error, because directly deleting MAT-CLNG-1
will introduce invalid reference in Construction
CLNG-1.
In some cases, you may still want to delete that object. You can
achieve this by setting .force to TRUE.
model$del("mat-clng-1", .force = TRUE)
#> Deleting object(s) [ID: 55] Object relation is shown below: ── Referred by
#> Others ────────────────────────────────────────────────────────── Class:
#> <Material:NoMass> └─ Object [ID:55] <MAT-CLNG-1> └─ 1: "MAT-CLNG-1"; !- Name
#> ^~~~~~~~~~~~~~~~~~~~~~~~~ └─ Class: <Construction> └─ Object [ID:68] <CLNG-1>
#> └─ 2: "MAT-CLNG-1"; !- Outside Layer
Purge unused resource objects (Idf$purge())
$purge() will delete resource objects specified that are
not used by any objects. Resource objects refer to objects that can be
referenced by other objects, e.g. Material,
Construction, Schedule:Compact and etc.
Below we remove all schedules that are not currently used.
model$purge(group = "Schedules")
#> Object(s) below have been purged: #1| Object ID [18] (name 'On/Off') in class
#> 'ScheduleTypeLimits' #2| Object ID [19] (name 'FlowRate') in class
#> 'ScheduleTypeLimits'
Find and remove duplicates (Idf$duplicated() &
Idf$unique())
$duplicatd() and $unique() can be used to
detect and remove duplicated objects, respectively. Here duplicated
objects refer to objects whose field values are the same except the
names. Object comments are ignored during comparison. These two methods
can be useful when doing model cleaning.
print(model$duplicated(group = "Schedules"))
#>                  class    id                               name duplicate
#>                 <char> <int>                             <char>     <int>
#>  1: ScheduleTypeLimits    14                         Any Number        NA
#>  2: ScheduleTypeLimits    15                           Fraction        NA
#>  3: ScheduleTypeLimits    16                        Temperature        NA
#>  4: ScheduleTypeLimits    17                       Control Type        NA
#>  5:   Schedule:Compact    20                           OCCUPY-1        NA
#>  6:   Schedule:Compact    21                           LIGHTS-1        NA
#>  7:   Schedule:Compact    22                            EQUIP-1        NA
#>  8:   Schedule:Compact    23                          INFIL-SCH        NA
#>  9:   Schedule:Compact    24                            ActSchd        NA
#> 10:   Schedule:Compact    25                      ShadeTransSch        NA
#> 11:   Schedule:Compact    26                       Htg-SetP-Sch        NA
#> 12:   Schedule:Compact    27                 PlenumHtg-SetP-Sch        NA
#> 13:   Schedule:Compact    28                       Clg-SetP-Sch        NA
#> 14:   Schedule:Compact    29                 PlenumClg-SetP-Sch        NA
#> 15:   Schedule:Compact    30            Zone Control Type Sched        NA
#> 16:   Schedule:Compact    31                       Min OA Sched        NA
#> 17:   Schedule:Compact    32                      FanAvailSched        NA
#> 18:   Schedule:Compact    33              CoolingCoilAvailSched        NA
#> 19:   Schedule:Compact    34              CoolingPumpAvailSched        NA
#> 20:   Schedule:Compact    35               ReheatCoilAvailSched        32
#> 21:   Schedule:Compact    36              CW Loop Temp Schedule        NA
#> 22:   Schedule:Compact    37              HW Loop Temp Schedule        NA
#> 23:   Schedule:Compact    38                       PlantOnSched        34
#> 24:   Schedule:Compact    39 Seasonal Reset Supply Air Temp Sch        NA
#> 25:   Schedule:Compact    40     OA Cooling Supply Air Temp Sch        NA
#> 26:   Schedule:Compact    41     OA Heating Supply Air Temp Sch        NA
#> 27:   Schedule:Compact    42                          Always On        34
#>                  class    id                               name duplicate
#>                 <char> <int>                             <char>     <int>
model$unique(group = "Schedules")
#> Duplications for object ID [32] (name 'FanAvailSched') in class
#> 'Schedule:Compact' have been removed: #1| Object ID [35] (name
#> 'ReheatCoilAvailSched') Duplications for object ID [34] (name
#> 'CoolingPumpAvailSched') in class 'Schedule:Compact' have been removed: #1|
#> Object ID [38] (name 'PlantOnSched') #2| Object ID [42] (name 'Always On')
Paste objects from IDF Editor (Idf$paste())
Once an IDF file is opened in IDF Editor, you can copy objects by
clicking the Copy Obj button in IDF Editor, and use
$paste() to insert those objects into current
Idf. Note that IDF Editor only exists on Windows, which
means that $paste() will also work only on that
platform.
Check possible field errors (Idf$validate())
$validate() checks if there are any errors in current
Idf under specified validation level. You can customize
what kind of errors to check by changing the level
argument. The default validation level is equal to
eplusr_option("validate_level").
There are 10 different validation check components in total. Three
predefined validation level are included, i.e. "none",
"draft" and "final". To get what validation
components those levels contain, use level_checks().
eplusr_option("validate_level")
#> [1] "final"
str(level_checks("final"))
#> List of 10
#>  $ required_object: logi TRUE
#>  $ unique_object  : logi TRUE
#>  $ unique_name    : logi TRUE
#>  $ extensible     : logi TRUE
#>  $ required_field : logi TRUE
#>  $ auto_field     : logi TRUE
#>  $ type           : logi TRUE
#>  $ choice         : logi TRUE
#>  $ range          : logi TRUE
#>  $ reference      : logi TRUE
In the previous section, we deleted a material named
MAT-CLNG-1.
The final validation level turns all checking components
on. We can just trigger invalid reference checking using
custom_validate() function.
model$validate(custom_validate(reference = TRUE))
#> $missing_object
#> character(0)
#>
#> $duplicate_object
#> Empty data.table (0 rows and 13 cols): object_id,object_name,class_id,class_name,field_id,field_index...
#>
#> $conflict_name
#> Empty data.table (0 rows and 13 cols): object_id,object_name,class_id,class_name,field_id,field_index...
#>
#> $incomplete_extensible
#> Empty data.table (0 rows and 13 cols): object_id,object_name,class_id,class_name,field_id,field_index...
#>
#> $missing_value
#> Empty data.table (0 rows and 13 cols): object_id,object_name,class_id,class_name,field_id,field_index...
#>
#> $invalid_autosize
#> Empty data.table (0 rows and 13 cols): object_id,object_name,class_id,class_name,field_id,field_index...
#>
#> $invalid_autocalculate
#> Empty data.table (0 rows and 13 cols): object_id,object_name,class_id,class_name,field_id,field_index...
#>
#> $invalid_character
#> Empty data.table (0 rows and 13 cols): object_id,object_name,class_id,class_name,field_id,field_index...
#>
#> $invalid_numeric
#> Empty data.table (0 rows and 13 cols): object_id,object_name,class_id,class_name,field_id,field_index...
#>
#> $invalid_integer
#> Empty data.table (0 rows and 13 cols): object_id,object_name,class_id,class_name,field_id,field_index...
#>
#> $invalid_choice
#> Empty data.table (0 rows and 13 cols): object_id,object_name,class_id,class_name,field_id,field_index...
#>
#> $invalid_range
#> Empty data.table (0 rows and 13 cols): object_id,object_name,class_id,class_name,field_id,field_index...
#>
#> $invalid_reference
#>    object_id object_name class_id   class_name field_id field_index
#>        <int>      <char>    <int>       <char>    <int>       <int>
#> 1:        68      CLNG-1       92 Construction    16878           2
#>       field_name  units ip_units type_enum value_id  value_chr value_num
#>           <char> <char>   <char>     <int>    <int>     <char>     <num>
#> 1: Outside Layer   <NA>     <NA>         5      634 MAT-CLNG-1        NA
#>
#> attr(,"class")
#> [1] "IdfValidity" "list"
As we can see, the invalid reference in construction
CLNG-1 is successfully detected.
In this example, we already knows that CLNG-1 is the
invalid object. In many cases, we don’t know that information in
advance. As $validate() returns a list of
data.tables, we can extract invalid objects for different
types directly using $validate(). Below we extract all
objects that have invalid reference errors.
(id <- model$validate()$invalid_reference$object_id)
#> [1] 68
model$objects(id)
#> $`CLNG-1`
#> <IdfObject: 'Construction'> [ID:68] `CLNG-1`
#> Class: <Construction>
#> ├─ 1*: "CLNG-1",     !- Name
#> └─ 2*: "MAT-CLNG-1"; !- Outside Layer
Then we can use $set() to correct them. We can get all
possible values for field Outside Layer using
$value_possible() method in IdfObject
class.
model$object(id)$value_possible("Outside Layer")$source
#> [[1]]
#>  [1] "WD10"          "RG01"          "BR01"          "IN46"
#>  [5] "WD01"          "PW03"          "IN02"          "GP01"
#>  [9] "GP02"          "CC03_renamed"  "mat1"          "mat2"
#> [13] "mat3"          "CP01"          "MAT-SB-U"      "MAT-FLOOR-1"
#> [17] "AL21"          "AL23"          "CLEAR 3MM"     "GREY 3MM"
#> [21] "CLEAR 6MM"     "LoE CLEAR 6MM" "AIR 6MM"       "AIR 13MM"
#> [25] "ARGON 13MM"
Now let’s change the construction’s Outside Layer to
WD10.
model$object(id)$set(Outside_Layer = "WD10")
#> <IdfObject: 'Construction'> [ID:68] `CLNG-1`
#> Class: <Construction>
#> ├─ 1*: "CLNG-1",   !- Name
#> └─ 2*: "WD10";     !- Outside Layer
Save to an IDF file (Idf$save())
You can save your model using $save(). If no path is
given, the path of model itself will be used. This may overwrite the
current file which has a risk of losing your original file and data. You
have to set overwrite to TRUE to confirm the
process.
(model$save(tempfile(fileext = ".idf")))
#> [1] "/tmp/Rtmp5tjCy6/file25ec713fb6c1.idf"

model$save(overwrite = TRUE)
#> Replace the existing IDF located at
#> /tmp/Rtmp5tjCy6/file25ec713fb6c1.idf.